How to Prepare Artwork for Embroidery Digitizing (Best File Types and Design Tips)

Preparing artwork correctly before embroidery digitizing is one of the most important steps in achieving clean and professional embroidery results. Even the most advanced digitizing software and embroidery machines cannot compensate for poorly prepared designs. For embroidery machine owners, designers, and clothing brands, understanding how to prepare artwork properly helps reduce production errors, saves time, and improves overall embroidery quality.
At EmbroiPlanet, we provide professional embroidery digitizing services for international clients, and we regularly encounter artwork issues that could have been avoided with proper preparation. This guide explains how to prepare artwork for embroidery digitizing to achieve the best possible results.
Why Artwork Preparation Matters in Embroidery Digitizing ?
Embroidery is fundamentally different from printing or digital graphics. It relies on physical stitches placed on fabric, which behave differently from pixels or ink.
Stitch Limitations Compared to Printed Designs
Printed designs can reproduce fine gradients, thin outlines, and complex shading, but embroidery uses thread with physical thickness. Very thin lines, soft gradients, and shadow effects often fail to stitch clearly and may lose detail during production.
Designs prepared specifically for embroidery take stitch behavior into account and focus on shapes that can be clearly formed using thread. This ensures better visual results and longer-lasting embroidery.
Fabric Movement and Stitch Interaction
During embroidery, fabric naturally shifts slightly under the needle. If artwork contains tightly packed elements or overlapping shapes, this movement can distort the final output.
Artwork preparation allows digitizers to compensate for fabric movement by adjusting spacing and stitch direction, preventing distortion and misalignment.
Best File Formats for Embroidery Digitizing
Using the correct file format significantly improves digitizing accuracy and reduces manual cleanup.
Vector Formats for Maximum Accuracy
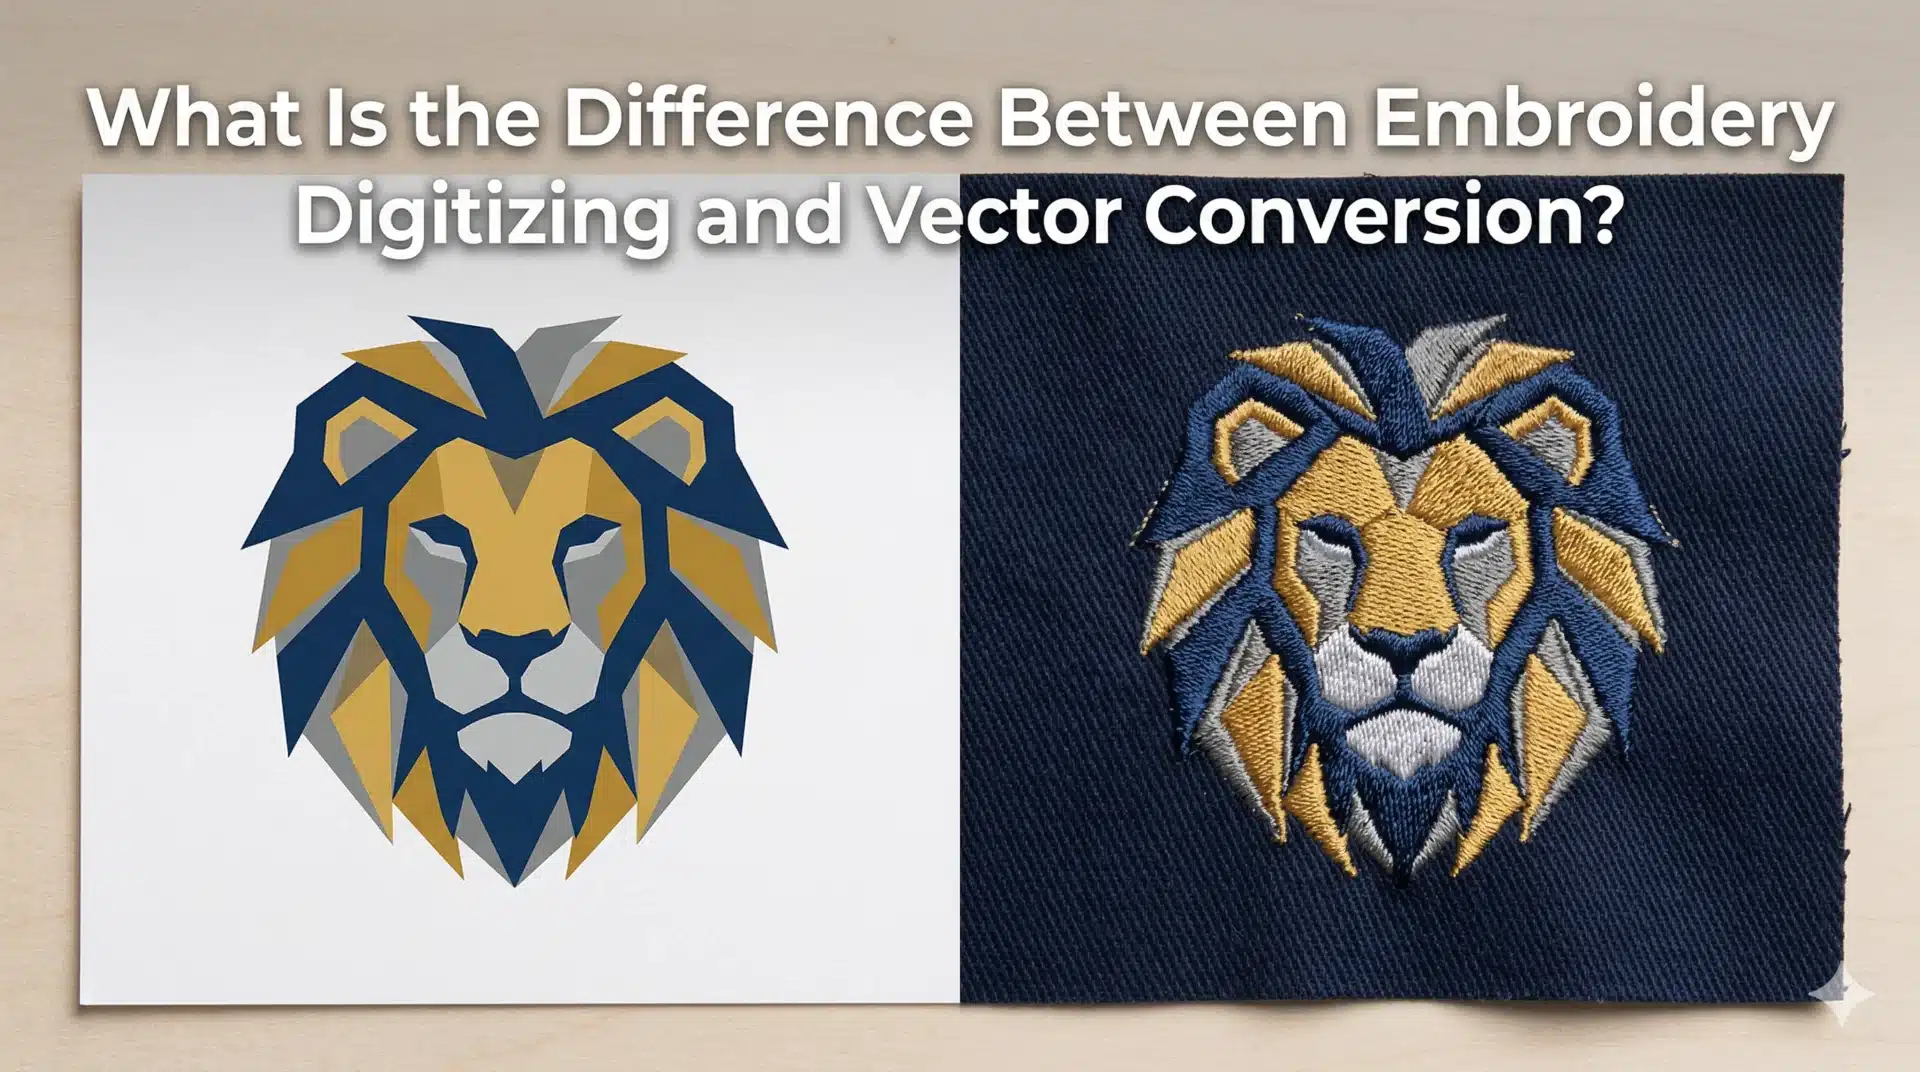
Vector formats such as AI, EPS, and SVG are ideal for embroidery digitizing because they preserve clean lines and smooth curves at any size. Digitizers can easily adjust shapes and spacing without quality loss.
Vector artwork also allows better control over stitch path planning, resulting in more accurate and efficient digitizing.
High-Resolution Raster Images When Vector Is Not Available
If vector files are unavailable, high-resolution PNG or JPG images can be used. The image should be sharp, well-lit, and at least 300 DPI to avoid pixelation and blurred edges.
Low-resolution images often require manual redrawing, which increases processing time and may affect design accuracy.
Understanding Embroidery Machine File Formats
Embroidery machine formats such as DST, PES, EMB, JEF, and EXP are not design files but production files. These formats contain stitch instructions and cannot be edited like normal artwork.
Providing original artwork rather than stitch files allows better digitizing results and design optimization.
Design Elements That Work Best for Embroidery
Not all visual designs are suitable for embroidery without modification.
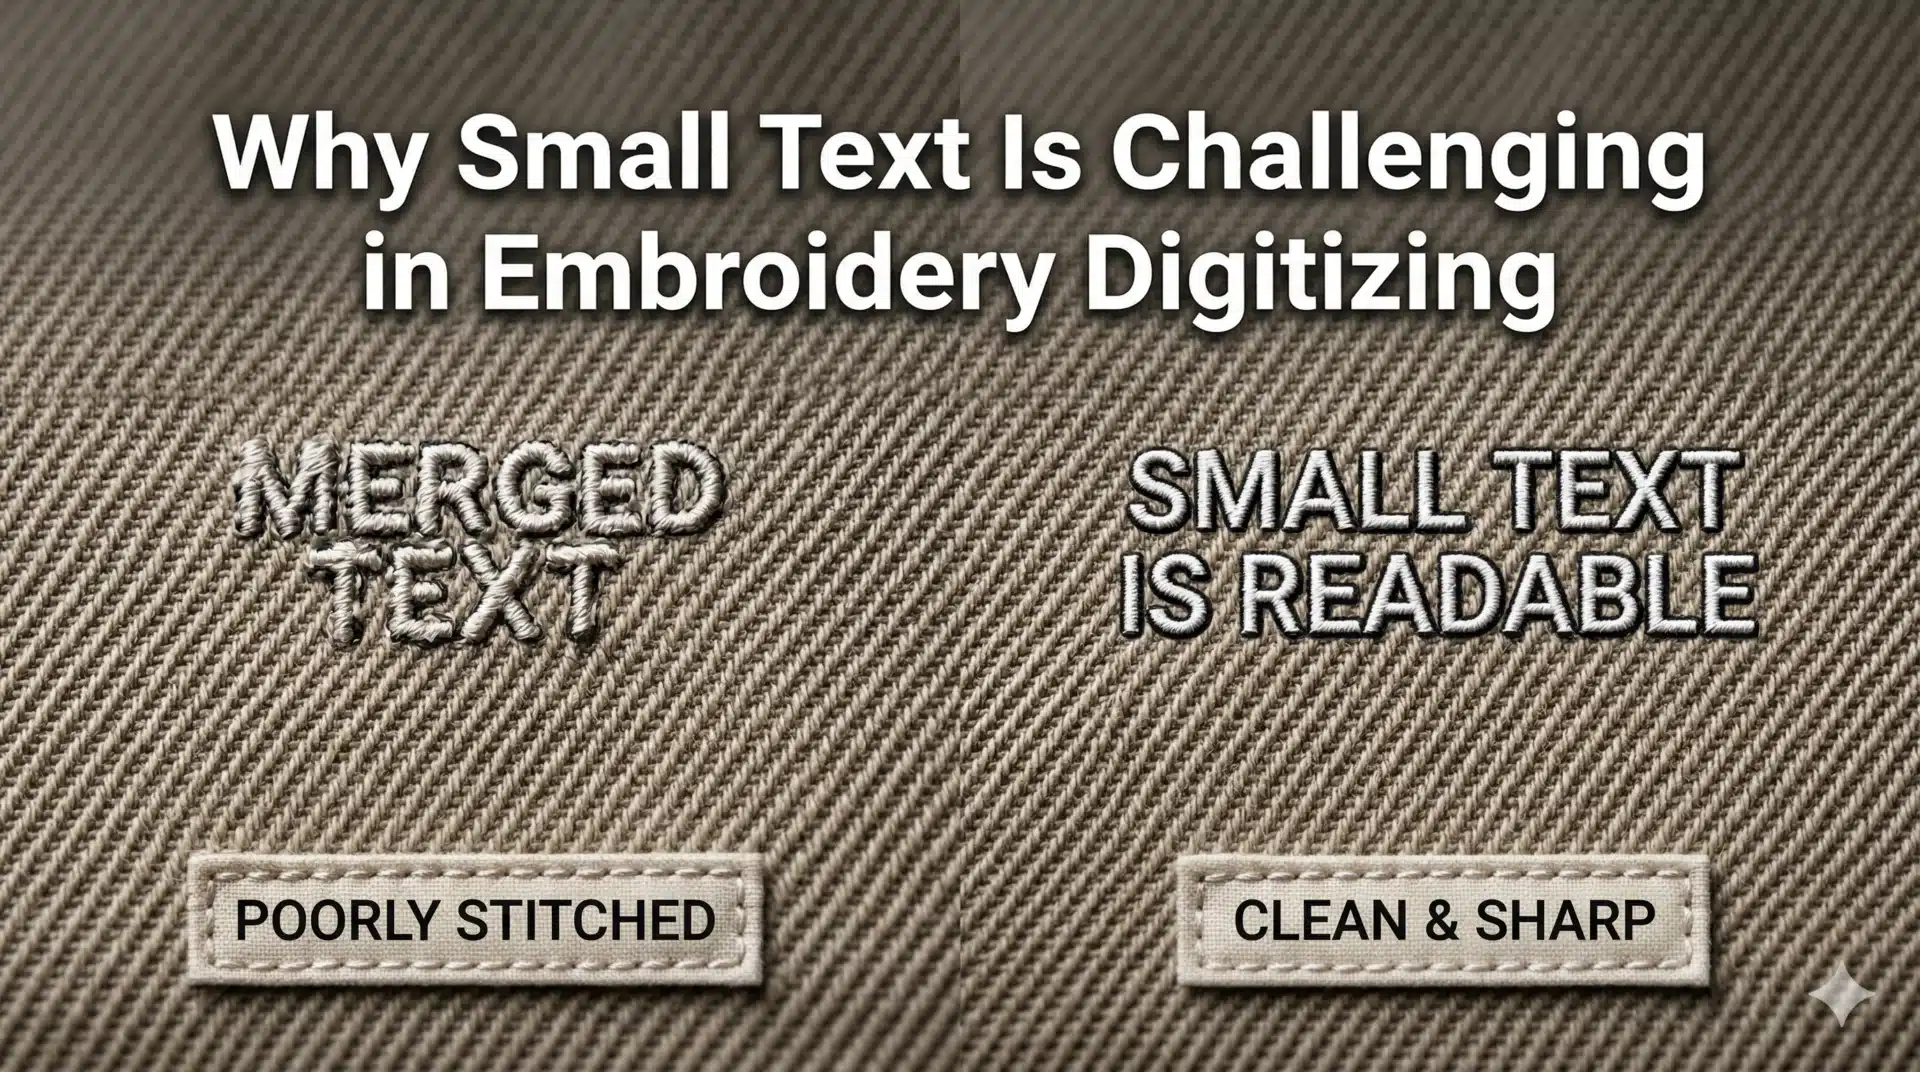
Line Thickness and Text Size Requirements for Embroidery
Extremely thin lines and very small text are among the most common causes of poor embroidery quality. Threads have physical thickness, and when stitch density increases, fine details may disappear or merge with nearby elements.
For most embroidery applications, text should be at least 5 mm in height, and lines should be thick enough to hold stitch coverage without distortion. Adjusting line thickness improves clarity and durability.
Managing Small Details and Tight Spaces in Designs
Artwork with small gaps between shapes or closely spaced elements can create stitch buildup and merging. During embroidery, thread spread can close small spaces and reduce design readability.
Simplifying fine details and increasing spacing between elements ensures cleaner stitching and better visual separation.
Using Solid Shapes Instead of Gradients and Shadows
Gradients and shadow effects are difficult to reproduce using embroidery threads. Since embroidery relies on stitch direction rather than color blending, gradients may appear uneven or unclear.
Using solid color areas with clean boundaries produces more predictable and professional embroidery results and improves consistency across production runs.
Color Selection Tips for Embroidery Digitizing
Color behavior in embroidery differs from digital displays and printing methods.
Thread Color Availability and Matching
Digital color codes do not always match available embroidery thread shades. Choosing colors that exist in standard thread charts ensures closer color reproduction during stitching.
When exact color matching is required, digitizers may adjust stitch density and layering to improve visual appearance.
Ensuring Sufficient Contrast With Fabric Color
Low-contrast designs may blend into fabric and lose visibility. High contrast between thread color and fabric color improves readability and brand recognition.
Artwork preparation should consider final garment colors to avoid unexpected visibility issues.
Limiting Excessive Color Changes
Designs with frequent color changes increase machine stops and production time. Simplifying color palettes improves production efficiency and reduces operational costs for embroidery businesses.
Sizing and Placement Considerations Before Digitizing
Design size and placement directly affect stitch behavior and final appearance.
Designing at Final Embroidery Dimensions
Scaling designs after digitizing can affect stitch density and shape integrity. Artwork should be prepared at the intended embroidery size whenever possible.
This allows digitizers to optimize stitch density and underlay specifically for final production conditions.
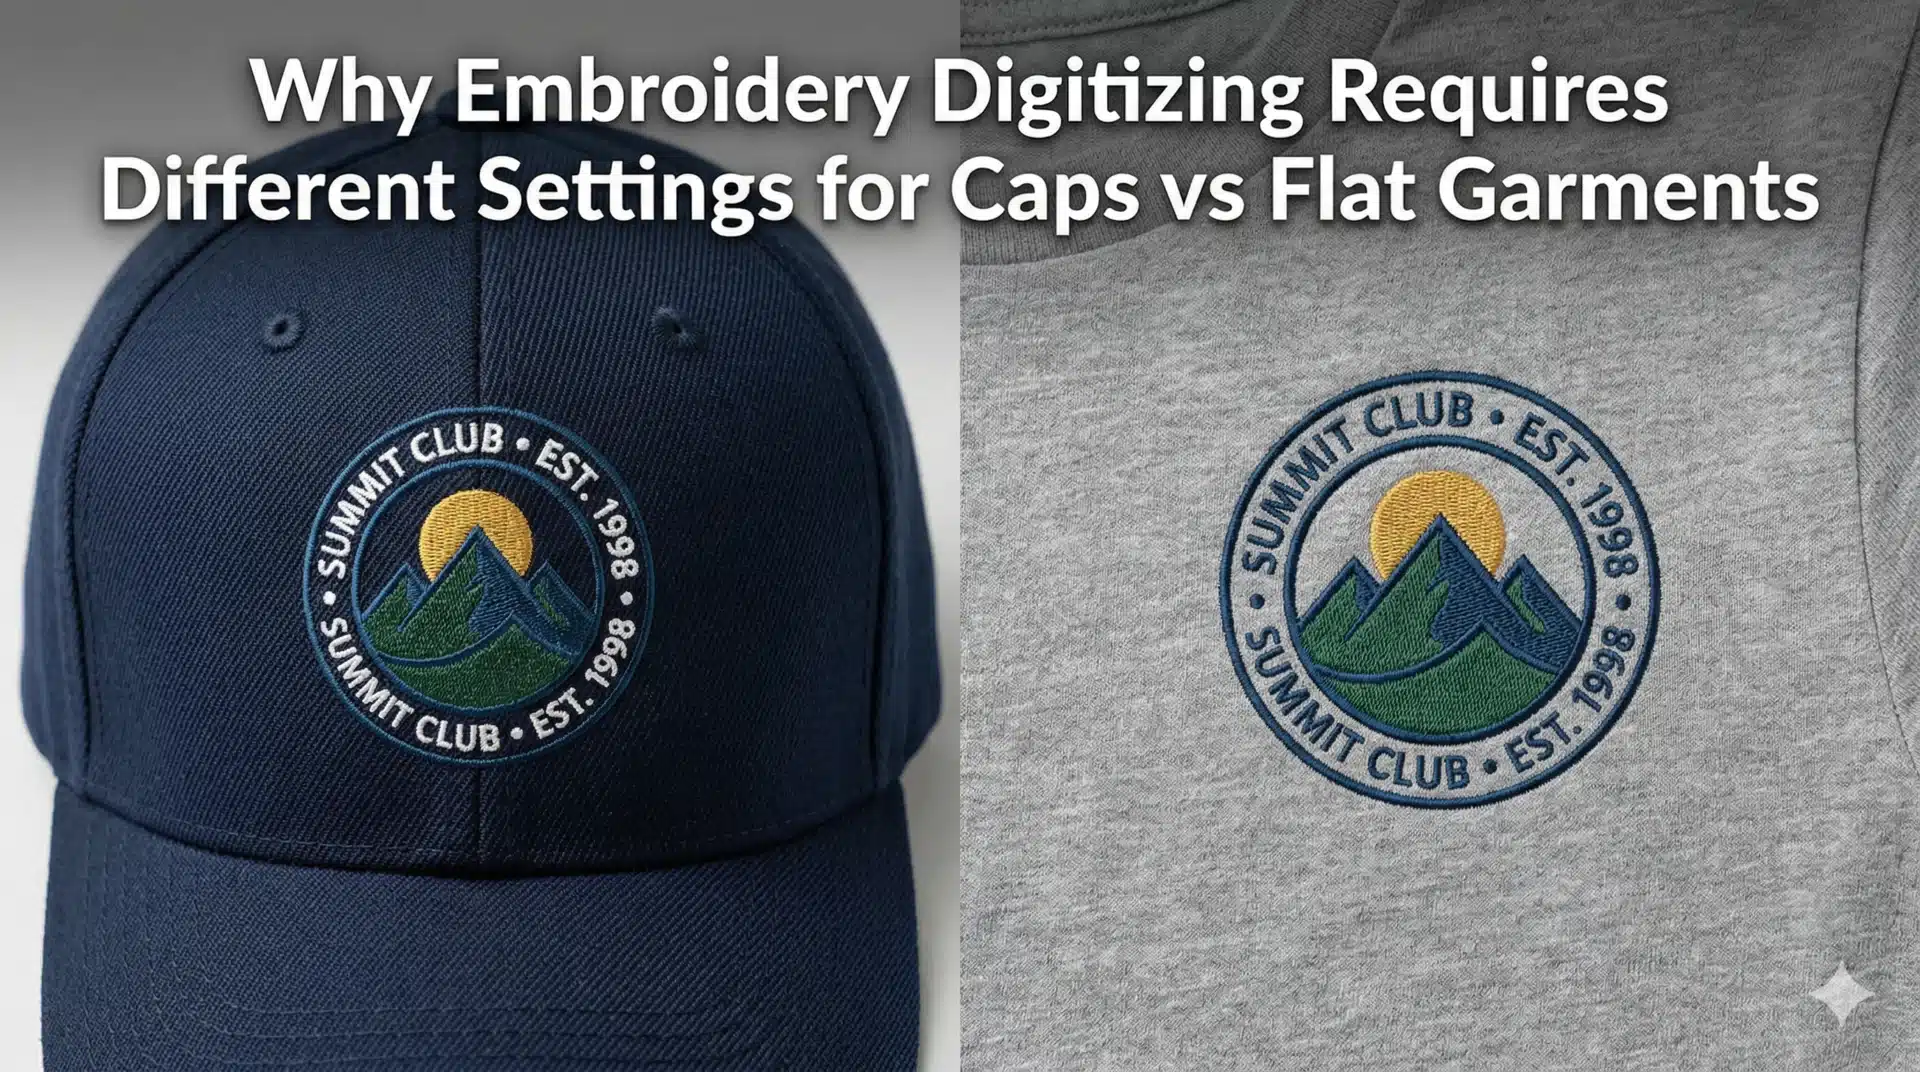
Placement Areas and Fabric Behavior
Different garment areas respond differently to stitching. Caps, sleeves, chest panels, and jacket backs each require different stitch strategies.
Understanding placement helps digitizers adjust stitch structure to suit fabric stretch and garment construction.
Common Artwork Mistakes That Affect Embroidery Quality
Many embroidery defects originate from design problems rather than machine malfunction.
Overly Complex Logos and Graphics
Highly detailed artwork may lose clarity when converted into stitches. Simplification improves stitch consistency and reduces thread breaks.
Removing unnecessary micro-details improves overall embroidery performance.
Low-Resolution Artwork Submissions
Pixelated images lead to jagged stitch paths and inaccurate outlines. High-resolution artwork allows smoother digitizing and better stitch planning.
Providing clean artwork reduces revision cycles and improves turnaround times.
Overlapping Objects Without Clear Boundaries
When shapes overlap without clear separation, stitch sequencing becomes difficult and can cause excessive thread buildup and uneven textures.
Clear object separation improves stitch layering and visual clarity.
How Professional Digitizing Improves Artwork Performance
Even well-prepared artwork benefits from professional digitizing expertise.
Stitch Path Optimization for Clean Output
Professional digitizers plan stitch directions to enhance shape definition and minimize thread distortion during high-speed stitching.
Proper stitch sequencing also reduces thread trims and machine stops.
Density Control Based on Fabric Type
Different fabrics require different stitch densities. Adjusting density prevents stiffness and fabric puckering while maintaining adequate coverage.
Underlay Stitch Engineering for Stability
Underlay stitches stabilize fabric and support top stitches. Proper underlay prevents distortion and improves stitch longevity, especially on stretchy materials.
How to Submit Artwork to EmbroiPlanet for Digitizing ?
Submitting complete and accurate information improves digitizing accuracy and reduces revisions.
What to Send for Digitizing Requests ?
Clients should provide:
- Vector artwork (AI, EPS, SVG) or high-resolution PNG/JPG
- Final embroidery size
- Preferred machine file format (DST, PES, EMB, etc.)
- Fabric type if known
Communication and Feedback Process
Clear communication helps align expectations. Clients can provide references, notes, or production feedback to fine-tune digitizing results.
Final Thoughts on Artwork Preparation for Embroidery Digitizing
Artwork preparation is the foundation of successful embroidery digitizing. Designs created for screen or print must be adapted for stitch-based production to achieve professional and durable results.
By following proper design guidelines and working with experienced digitizers, businesses and designers can significantly improve embroidery quality and production efficiency. EmbroiPlanet provides professional embroidery digitizing services designed to support reliable production across global embroidery environments.
About Embroiplanet

Latest Posts
Why Embroidery Digitizing Requires Different Settings for Caps vs Flat Garments ?
Why Small Text Is Challenging in Embroidery Digitizing ?